Bicycle Trailer Attachments: Why They Matter
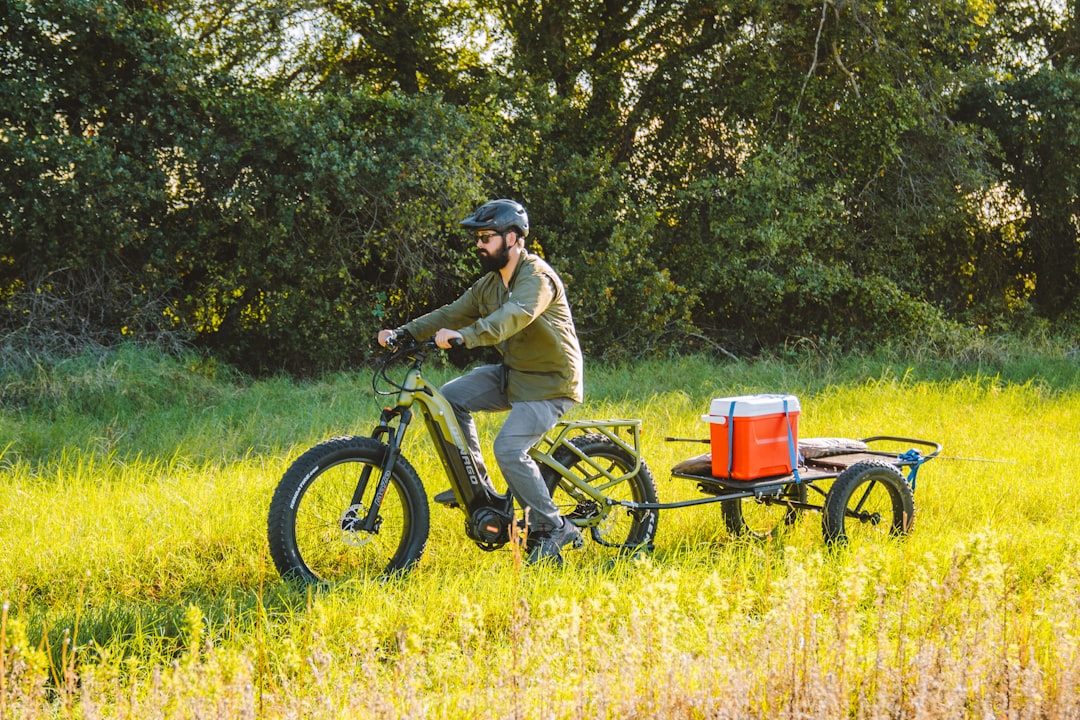
Attaching a trailer to your bike might seem daunting, but understanding it is essential for a safe and enjoyable ride. Whether you’re hauling kids, pets, or cargo, the right bicycle trailer attachment can make all the difference.
Quick Answer to Bicycle Trailer Attachments:
- Axle Attachments: Great for stability and heavy loads. More complex installation.
- Seatpost Attachments: Easier to install, versatile. May affect bike’s balance.
Choosing the proper attachment ensures better performance and safety.
A bicycle trailer attachment not only lets you carry more but also does so securely. Proper attachment is crucial for maintaining your bike’s balance and handling. Incorrect installation can lead to accidents, especially with heavier loads. Knowing the pros and cons of each attachment type will help make an informed decision.
Key Points to Know:
- Importance: Stability and ease of use greatly depend on the attachment type.
- Safety: Correct attachment prevents accidents and ensures a smoother ride.
Choosing between axle and seatpost attachments comes down to your specific bike, trailer, and needs. Let’s dive into the details to make your ride safer and more enjoyable.

Bicycle trailer attachment terms you need:
Types of Bicycle Trailer Attachments
When it comes to bicycle trailer attachments, there are two main types: axle attachments and seatpost attachments. Each has its own benefits and drawbacks, and the best choice depends on your bike, trailer, and the type of riding you do.
Axle Attachments
Axle attachments connect the trailer to the bike’s axle. They are known for their stability and ability to handle heavier loads. There are three main types of axle attachments:
-
Quick-Release Axles:
- Ease of Use: Quick-release axles are user-friendly and allow for easy attachment and detachment of the trailer.
- Compatibility: These are common on many bikes, but ensure the skewer is long enough to accommodate the trailer hitch. A longer skewer may be needed.
- Installation: Adjust the skewer to engage with at least five complete threads for a secure fit.
-
Bolt-On Axles:
- Stability: Bolt-on axles provide a very secure connection, ideal for heavier loads.
- Tools Required: You will need a wrench to loosen and tighten the axle nut during installation.
- Compatibility: Make sure there is enough axle length to reattach the nut securely—about five full turns of the nut.
-
Thru-Axles:
- Strength: Thru-axles are incredibly strong and are often found on mountain and road bikes.
- Compatibility: Check the thread pitch, axle length, and hitch hole diameter. Thru-axles over 12 mm may require adapters.
- Installation: Use adapters sized correctly for the axle’s diameter, length, and thread pitch. Refer to the bike’s manual or use an axle identification tool for precise measurements.

Seatpost Attachments
Seatpost attachments connect the trailer to the bike’s seatpost. They are easier to install but may affect the bike’s balance and handling.
-
Ease of Use:
- Installation: Seatpost attachments are generally simpler to install compared to axle attachments. They usually require fewer tools and less effort.
- Universal Fit: These attachments are often designed to fit a wide range of bikes, making them a versatile choice.
-
Stability:
- Weight Distribution: Seatpost attachments can affect the bike’s balance, especially when carrying heavier loads. The weight is higher up, which can make the bike feel less stable.
- Safety: While easier to install, seatpost attachments might not be as secure as axle attachments for very heavy or uneven loads.
-
Weight Distribution:
- Impact on Handling: The higher attachment point can change the bike’s handling characteristics, making it feel top-heavy.
- Load Capacity: Seatpost attachments are generally better suited for lighter loads. Heavier loads may impact stability and safety.
Compatibility
Ensuring compatibility between your bike and trailer is crucial for a safe and smooth ride.
- Axle Compatibility: Most bike trailers are designed with quick-release axles in mind. If you have a bolt-on or thru-axle, check if adapters are available.
- Seatpost Compatibility: Seatpost attachments are more universally compatible but always double-check the specific fit for your bike and trailer model.
Key Takeaways:
- Axle Attachments: Best for stability and heavy loads but can be complex to install.
- Seatpost Attachments: Easier to install and versatile but may affect bike balance and are better for lighter loads.
Understanding these differences will help you choose the right bicycle trailer attachment for your needs. Next, we will look at the pros and cons of each attachment type in more detail.
Pros and Cons of Axle Attachments
Pros
1. Stability:
Axle attachments provide excellent stability. By connecting the trailer near the bike’s center of gravity, they help maintain balance, especially on rough terrain.
2. Weight Capacity:
These attachments can handle heavier loads. They are designed to distribute weight efficiently, making them ideal for carrying cargo or multiple passengers.
3. Secure Fit:
Axle attachments ensure a secure fit. They lock tightly onto the bike, reducing the risk of detachment during rides.
Cons
1. Complex Installation:
Installing axle attachments can be tricky. Quick-release and bolt-on axles require tools and precise adjustments. Thru-axles may need specific adapters, adding to the complexity.
2. Compatibility Issues:
Not all bikes are compatible with axle attachments. You must check the thread pitch, axle length, and hitch hole diameter. Some thru-axles, especially those over 12 mm, may not fit standard hitches.
3. Cost:
Axle attachments can be expensive. The need for additional tools or adapters can increase the overall cost.
Understanding these pros and cons will help you decide if axle attachments are the right choice for your bicycle trailer attachment. Next, we will explore the pros and cons of seatpost attachments.
Pros and Cons of Seatpost Attachments
Pros
1. Ease of Use:
Seatpost attachments are incredibly user-friendly. They are designed for quick and easy installation, often requiring no more than a simple clamp or bolt. This makes them perfect for cyclists who want a hassle-free setup.
2. Universal Fit:
One of the biggest advantages is their versatility. Seatpost attachments are compatible with almost any bike, regardless of the axle type or frame design. This universal fit is a major plus for those who might switch between different bikes.
3. Cost-Effective:
These attachments are generally more affordable than axle attachments. You won’t need specialized tools or adapters, keeping the costs down. This makes them a budget-friendly option for many cyclists.
4. Safety:
Seatpost attachments offer a secure connection between the bike and the trailer. They are designed to keep the trailer upright and stable, even during sudden stops or turns. This improves overall safety for both the rider and the cargo.
Cons
1. Weight Distribution:
One downside is the impact on weight distribution. Since the attachment point is higher, it can affect the bike’s balance. This is particularly noticeable when carrying heavy loads, as it may make the bike feel top-heavy.
2. Stability:
While generally safe, seatpost attachments can be less stable compared to axle attachments, especially on rough or uneven terrain. This can lead to a wobblier ride, which might not be ideal for everyone.
3. Limited Capacity:
Seatpost attachments typically have a lower weight capacity. They are best suited for lighter loads, making them less ideal for heavy cargo or multiple passengers. If you need to haul substantial weight, an axle attachment might be a better choice.
Understanding these pros and cons will help you determine if a seatpost attachment is the right bicycle trailer attachment for your needs. Next, we’ll guide you on how to choose the right attachment based on your bike type, trailer type, and usage.
How to Choose the Right Bicycle Trailer Attachment
Choosing the right bicycle trailer attachment depends on your bike type, trailer type, and how you plan to use it. Let’s break down the options for different axle types.
For Quick-Release Axles
Bike Type:
Quick-release (QR) axles are common on road bikes, hybrid bikes, and some mountain bikes.
Trailer Type:
Most bike trailers are designed with QR axles in mind, making this a versatile choice for both child and cargo trailers.
Usage:
Ideal for everyday use, such as commuting or family outings.
Installation Steps:
- Lift the Quick-Release Lever: Open the lever and unscrew the nut on the opposite side.
- Insert the Skewer Through the Hitch: Ensure the hitch flanges face away from the bike and point towards the rear.
- Secure the Nut and Lever: Tighten the nut and close the lever. Make sure the skewer engages with at least 5 complete threads.
Tools Required:
- Quick-release skewer (usually included with the bike)
- No additional tools needed
For Bolt-On Axles
Bike Type:
Bolt-on axles are found on many older bikes and some single-speed or fixed-gear bikes.
Trailer Type:
Compatible with most bike trailers, but ensure you have enough axle length for secure attachment.
Usage:
Great for varied uses, including city commuting and light trail riding.
Installation Steps:
- Loosen the Left-Side Nut: Use a wrench to loosen (but not remove) the left-side axle nut.
- Attach the Hitch: Slide the hitch onto the axle, ensuring it fits snugly against the dropout.
- Reattach the Nut: Tighten the nut securely, ensuring at least 5 full turns.
Tools Required:
- Wrench (usually 15mm)
For Thru-Axles
Bike Type:
Thru-axles are common on modern mountain bikes, gravel bikes, and some road bikes.
Trailer Type:
Not all trailers are compatible out-of-the-box. You’ll likely need an adapter.
Usage:
Best for rugged terrain and off-road trips due to their durability.
Installation Steps:
- Remove the Thru-Axle: Unscrew and remove the thru-axle from the bike frame.
- Attach the Adapter: Insert a thru-axle adapter that matches your bike’s thread pitch, axle length, and diameter.
- Secure the Hitch: Slide the hitch onto the adapter and re-insert the thru-axle through the hitch and bike frame.
- Tighten the Axle: Ensure everything is securely tightened.
Tools Required:
- 5mm hex wrench
- Thru-axle adapter (specific to your bike’s measurements)
Adapters:
Thru-axle adapters are essential. Brands like Robert Axle Project specialize in these adapters, ensuring a proper fit for your bike and trailer.
Choosing the right attachment is crucial for a safe and enjoyable ride. Next, we’ll answer some frequently asked questions about bicycle trailer attachments.
Frequently Asked Questions about Bicycle Trailer Attachments
How to attach a bike trailer without a coupler?
Universal Hitch:
If your bike trailer didn’t come with a coupler, you can use a universal hitch. This type of hitch is designed to fit a variety of bike frames and axle types.
DIY Coupler:
For the DIY enthusiasts, creating your own coupler is an option, but it requires some mechanical skill. You’ll need strong materials like steel and precise measurements to ensure safety.
Safety Risks:
Be cautious with DIY solutions. An improperly fitted coupler can lead to accidents. Always double-check your work and consult a professional if unsure.
Can any bike pull a trailer?
Bike Compatibility:
Not all bikes can pull a trailer. Generally, bikes with sturdy frames and reliable braking systems are suitable. Road bikes, mountain bikes, and hybrid bikes are good options.
Trailer Types:
There are various types of trailers, including child trailers, cargo trailers, and pet trailers. Make sure the trailer you choose is compatible with your bike’s axle type.
Weight Limits:
Check the weight limits of both your bike and the trailer. Overloading can cause damage and make handling difficult. Most trailers have weight limits ranging from 50 to 100 pounds.
How do you carry a bike when towing a trailer?
Hitch Receiver:
A hitch receiver is a great option for carrying a bike while towing a trailer. It attaches to the back of your vehicle and can hold one or more bikes securely.
Roof Rack:
A roof rack is another option, especially if you need to carry multiple bikes. Ensure your vehicle’s roof can support the weight and that the bikes are securely fastened.
Truck Bed:
For those with a truck, the bed is a convenient place to carry bikes. Use tie-down straps to keep the bikes in place and avoid damage.
Choosing the right method for carrying your bike ensures safety and convenience. Next, let’s dive into some more detailed aspects of bicycle trailer attachments.
Conclusion
Attaching a bike trailer to your bicycle can significantly improve your riding experience, whether you’re transporting kids, cargo, or pets. Understanding the different types of bicycle trailer attachments—axle and seatpost—can help you make an informed decision that best suits your needs.
Summary
Axle attachments, including quick-release, bolt-on, and thru-axles, offer stability and a secure fit but can be complex to install and may require additional adapters. On the other hand, seatpost attachments are easier to install and more universally compatible but may have limitations in weight distribution and stability.
Recommendations
-
For Stability and Heavy Loads:
- Axle Attachments: Opt for axle attachments if you need to haul heavier loads or prioritize stability. Quick-release and bolt-on axles are generally easier to work with than thru-axles, which may require specialized adapters.
-
For Ease of Use and Versatility:
- Seatpost Attachments: Choose seatpost attachments for simpler installation and greater versatility. These are ideal for lighter loads and offer a more straightforward setup.
-
Consider Your Bike and Trailer Type:
- Ensure compatibility between your bike’s axle type and the trailer. Check weight limits and consult your bike’s manufacturer if you’re unsure.
-
Safety First:
- Whether you go for an axle or seatpost attachment, always double-check the installation and consult a professional if needed. Safety should never be compromised.
Doot Scoot: Your Go-To for Sustainable Urban Transport
At Doot Scoot, we are committed to making urban mobility more sustainable and efficient. Our expert guides and comprehensive reviews are designed to help you make informed decisions about eBikes and related accessories. Whether you’re a novice or a seasoned rider, we provide valuable insights to improve your riding experience.
Explore our website for more in-depth guides, reviews, and tips on how to make the most out of your cycling trips. Join our community of eco-conscious urban dwellers and take the first step towards a greener, more efficient mode of transport.


