Adjusting bike derailleur can seem like a daunting task, but it’s essential for ensuring smooth and reliable shifting on your bike. Whether you’re tackling city commutes or exploring scenic trails, having a properly adjusted derailleur will make your ride more enjoyable and safe. Here’s what you need to know to get started:
- Check your chain wear: A worn-out chain can cause shifting problems. Use a chain checker tool to see if it’s time for a replacement.
- Inspect your cables and housing: Look for any damage or frays that could be affecting your bike’s shifting performance.
- Evaluate the derailleur hanger: Ensure it’s not bent, as this can cause erratic shifting and potential damage.
- Adjust the limit screws: Fine-tune these to set the boundaries of your derailleur’s movement.
- Tweak the cable tension: Use the barrel adjuster to ensure your gears shift properly.
These steps form the foundation of adjusting bike derailleur and will help you get back to smooth and silent shifting.

Understanding Your Bike Derailleur
To adjust your bike derailleur effectively, it’s crucial to first understand its components and potential problem areas. Let’s break down the essentials:
Derailleur Parts
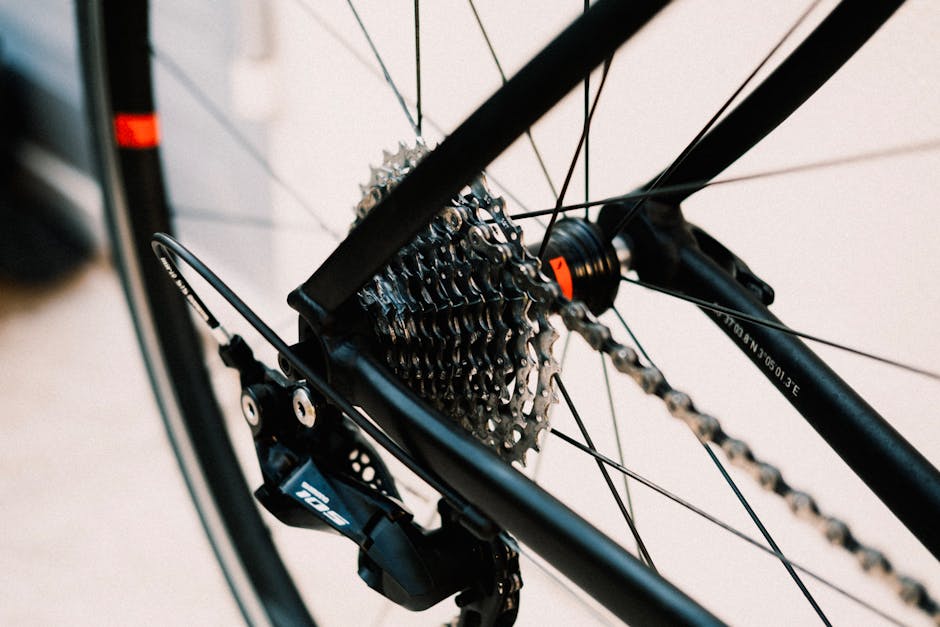
The rear derailleur is a complex piece of engineering that keeps your chain moving smoothly across the cassette. Here are the key parts you should know:
- B-Knuckle: This is the upper part of the derailleur that connects to the frame.
- Guide Pulley: Keeps the chain in line as it moves from cog to cog.
- Idler Pulley: Maintains tension on the chain, ensuring smooth operation.
- Limit Screws (H & L): These screws prevent the derailleur from moving too far inward or outward, protecting your chain from slipping off.
- Cable Bolt: Holds the shift cable in place, crucial for accurate shifting.
Chain Wear
Chains wear out over time, especially if you ride frequently or in harsh conditions. A worn chain can lead to poor shifting and even damage other drivetrain components like the cassette and chainrings. Use a chain checker tool to measure wear. If it shows 0.5% wear on an 11 or 12-speed chain, it’s time to replace it.
Damaged Housing or Cable
Cables and their housing can degrade, leading to poor shifting performance. Check for visible damage, such as pinches or frays, that could restrict cable movement. Damaged cables or housing should be replaced to ensure smooth shifting.
Bent Hanger
A bent derailleur hanger is a common cause of shifting issues. Hangers can bend easily from impacts, like a fall or a bike tip-over. A misaligned hanger can cause your chain to shift into the spokes, leading to severe damage. Before adjusting the derailleur, ensure the hanger is straight or have it aligned by a professional.
By understanding these components and potential issues, you’re better equipped to tackle any derailleur adjustments needed for smooth, reliable shifting.
How to Adjust Your Bike Derailleur
Limit Screws Adjustment
Limit screws are your first stop when fine-tuning your bike’s derailleur. These small screws, labeled H (high) and L (low), set the boundaries for how far your derailleur can move. They keep the chain from slipping off the cassette or into the spokes.
-
H Screw: This restricts how far the derailleur can move outward, toward the smallest cog. When adjusting the H screw, you want the jockey wheel to align perfectly under the smallest sprocket. Turn it clockwise to move the derailleur closer to the frame, and counterclockwise to move it outward.
-
L Screw: This controls the inward movement, towards the largest cog. When set correctly, the derailleur won’t push the chain into the wheel. Adjust it by turning clockwise to prevent further inward movement.
These adjustments are crucial for protecting your chain and ensuring smooth transitions between gears.
Cable Tension and Indexing
Once the limit screws are set, it’s time to focus on cable tension. Proper tension ensures that your derailleur shifts smoothly between gears.
-
Barrel Adjuster: Located near where the cable exits the derailleur, this handy tool helps fine-tune cable tension. Turn it counterclockwise to increase tension, which helps if the chain hesitates to move to a larger cog. Turn it clockwise to decrease tension if the chain skips or jumps over gears.
-
Cable Stretch: Over time, the shift cable may settle into the housing, causing a phenomenon often mistaken for stretch. Regularly adjusting the barrel adjuster helps maintain smooth shifting, even as the cable settles.
B Tension Screw Adjustment
The B tension screw is often overlooked but plays a key role in shifting accuracy. It adjusts the body angle of the derailleur, affecting the gap between the top pulley and the cassette.
- Body Angle and Pulley Gap: For optimal shifting, the gap should be neither too wide nor too narrow. With the chain on the largest sprocket, adjust the B tension screw until the pulley sits close enough to the cassette for efficient shifting, but not so close that it causes noise or interference.
By addressing these adjustments—limit screws, cable tension, and B tension—you can ensure that your bike shifts smoothly and reliably, keeping your rides enjoyable and hassle-free.
Common Problems and Solutions
When it comes to adjusting your bike derailleur, several common problems can disrupt smooth shifting. Let’s explore these issues and how to solve them.
Chain Skip
Chain skip is when your chain jumps unexpectedly, usually while pedaling hard. This can be frustrating and dangerous.
Causes:
- Worn Chain: As chains wear, they can cause the teeth on the cassette to wear down too. This wear leads to skipping.
- Stiff Links: A tight or damaged link can cause the chain to skip.
Solution:
- Check Chain Wear: Use a chain checker tool to see if your chain needs replacing. Replace it if wear exceeds 0.5% for 11 and 12-speed chains.
- Fix Stiff Links: If you notice a stiff link, use a chain tool to gently spread the outer plates, or twist the links side to side if you’re on the go.

Frayed Cable
A frayed cable can cause inconsistent shifting or prevent shifting altogether.
Causes:
- Cable Damage: Fraying often occurs where the cable bends, especially near the derailleur.
- Damaged Housing: Kinks or pinches in the cable housing can restrict cable movement.
Solution:
- Inspect and Replace: Check the cable and housing for damage. If the cable is frayed or the housing is kinked, replace them. For internal routing, consider replacing both to ensure smooth operation.
Bent Derailleur Hanger
A bent derailleur hanger can misalign your derailleur, leading to shifting issues.
Causes:
- Physical Impact: Falls, bike storage, or shipping can bend the hanger.
Solution:
- Check Alignment: Look from behind your bike to see if the hanger is parallel with the cassette. Use a derailleur hanger alignment gauge to verify and adjust it. If too bent, replace it.
Addressing these common problems—chain skip, frayed cable, and bent derailleur hanger—will help maintain smooth, reliable shifting. Up next, we’ll dive into frequently asked questions to further improve your understanding.
Frequently Asked Questions about Adjusting Bike Derailleur
How do I know if my derailleur needs adjustment?
If your bike isn’t shifting smoothly, it’s time to check your derailleur.
Signs of a problem:
- Chain Movement: If your chain hesitates or struggles to move from one cog to another, your derailleur might be out of alignment.
- Cog Skipping: When the chain unexpectedly jumps over cogs, especially under load, it could indicate wear or improper adjustment.
Routine checks can prevent major issues. Use a chain checker tool to monitor wear and ensure your derailleur is in top shape.
What are the H and L screws on a rear derailleur?
The H and L screws are crucial for derailleur control. They keep your chain from going too far in either direction.
- H Screw (High Limit): This screw limits the derailleur’s outward travel, preventing the chain from falling off the smallest cog.
- L Screw (Low Limit): This screw stops the derailleur from moving too far inward, protecting your spokes from chain interference.
To adjust, turn the screws gradually while pedaling. Listen for rubbing or excessive noise, and make small tweaks until the chain moves smoothly.
How to adjust the B tension screw?
The B tension screw is key for fine-tuning shifting performance. It affects the distance between the derailleur’s top pulley wheel and the cogs.
Steps to adjust:
- Locate the Screw: It’s typically on the upper part of the derailleur.
- Adjust the Gap: Aim for a 3mm gap between the pulley wheel and the largest cog.
- Test Shifting: Pedal and shift through gears to ensure the chain moves smoothly without rubbing.
Properly adjusting the B tension screw improves your bike’s shifting accuracy, making for a smoother ride.

By understanding these key components—chain movement, limit screws, and pulley wheel adjustments—you’ll keep your bike in peak condition. Now, let’s explore how to handle any remaining concerns you might have.
Conclusion
Adjusting your bike’s derailleur might seem daunting at first, but with the right guidance, it becomes a simple task. At Doot Scoot, we believe that every rider should have the confidence to tackle basic bike maintenance. By taking charge of your bike’s derailleur adjustments, you not only ensure a smoother ride but also contribute to a more eco-friendly transportation system.
Cycling is one of the most sustainable forms of urban transport. It reduces carbon footprints and encourages healthier lifestyles. Properly maintaining your bike, including keeping the derailleur in check, ensures that you’re always ready to hit the road efficiently and safely.
Our team at Doot Scoot is dedicated to providing expert guidance on all things cycling. Whether you’re a seasoned cyclist or just starting out, our resources are designed to help you make informed decisions. From comprehensive eBike reviews to in-depth how-to guides, we’re here to support your journey towards sustainable urban mobility.
For more tips and expert advice on maintaining your bike and embracing sustainable transport, visit our Doot Scoot service page. Join us in making urban transportation smarter and greener, one ride at a time!


